Winter gardening can be incredibly rewarding, and one of the best tools you can use is a cold frame.
If you’re curious how to build a cold frame, you’ve come to the right place.
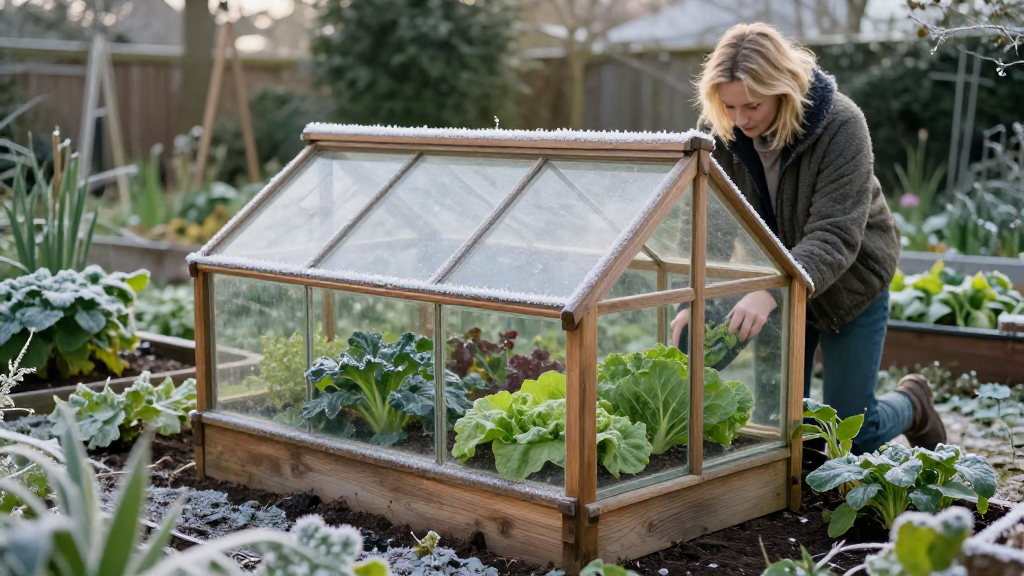
What is a Cold Frame?
A cold frame is a simple structure that allows gardeners to extend their growing season by protecting plants from harsh winter weather.
Usually constructed with a transparent lid and a sturdy frame, a cold frame traps solar energy during the day, providing a warm environment for seedlings and establishing hardiness.
Why Should You Build a Cold Frame This Winter?
Building a cold frame offers numerous benefits:
-
Extended Growing Season: Cold frames allow you to start growing earlier in spring and continue later into fall.
-
Protection from Frost: These structures shield your plants from unexpected frosts and winter chill.
-
Cost-Effective: Materials for building a cold frame can often be sourced from waste or leftover materials.
-
Versatile Use: A cold frame can be used to cultivate seedlings, herbs, or even vegetables during winter months.
How to Build a Cold Frame: What Materials Do You Need?
Understanding how to build a cold frame starts with gathering the necessary materials. Here’s what you’ll need:
Essential Materials:
-
Wood: Choose rot-resistant wood such as cedar or redwood for durability.
-
Transparent Cover: Use clear plastic or glass panels that will allow sunlight to enter.
-
Hinges: These will be used for the lid so you can easily access your plants.
-
Screws and Nails: To assemble the frame securely.
-
Insulation (Optional): Consider adding insulation for colder climates, such as straw bales or rigid insulation board.
How Do You Construct a Cold Frame?
Now that you have your materials, here’s a step-by-step guide on how to build a cold frame:
Step 1: Design Your Cold Frame
Determine the size of your cold frame depending on the space available in your garden. A commonly used dimension is approximately:
- Length: 4 feet
- Width: 3 feet
- Height: 1.5 feet at the back and 1 foot at the front for a sloped roof to allow rain runoff.
Step 2: Cut the Wood
Cut your wooden boards according to your measurements. Here’s a breakdown:
- Sides: Two boards for the longer sides (4’ each).
- Ends: Two boards (3’ each).
- Base: Additional boards as needed for stability.
- Top (lid): Two pieces of wood to form the lid, matching the length and width.
Step 3: Assemble the Box
Using screws or nails, assemble the wooden boards into a rectangular box. Secure all corners and ensure the structure is sturdy:
- Start by attaching the longer sides to the end pieces in a rectangular shape.
- Create the base by attaching additional boards, particularly if your area is prone to strong winds.
Step 4: Attach the Lid
The lid should fit snugly but be easily liftable for ventilation. Attach using hinges:
- Join the lid at the back edge of the cold frame.
- Ensure it can be propped open for ventilation on warm days.
Step 5: Install the Transparent Cover
Once the frame is complete, install your transparent cover:
- If using glass: Carefully place the glass panels into the frame, sealing edges to maintain warmth.
- If using plastic: Lay over the top and secure with wooden strips.
Where Should You Position Your Cold Frame?
Another crucial aspect of learning how to build a cold frame is understanding the best location:
-
Sunlight: Choose a sunny spot that receives at least 6 hours of sunlight daily.
-
Protection from Wind: Place it near a wall or fence for added protection against harsh winds.
-
Accessibility: Make sure it’s easy to access for planting, watering, and harvesting.
How Do You Use a Cold Frame in Winter Gardening?
Once your cold frame is built, you’ll want to maximize its effectiveness. Here are some tips:
1. Select the Right Crops
Not all plants thrive in a cold frame during winter. Consider planting:
-
Leafy greens: Spinach, lettuce, and kale.
-
Root vegetables: Carrots, radishes, and beets.
-
Herbs: Parsley, cilantro, and chives.
2. Monitor Temperature
Your cold frame might trap heat, so be vigilant:
- Open the lid on warmer days.
- Close it at night when temperatures drop.
3. Water Wisely
Watering can be tricky during winter:
- Check moisture levels regularly, as a frozen top layer can mask dryness beneath.
- Water less frequently and only if needed.
What Are Common Mistakes to Avoid?
As you practice how to build a cold frame, be aware of these pitfalls:
-
Poor Ventilation: Not allowing fresh air to circulate can lead to mold and death of plants.
-
Too Much Shade: Ensure your site receives adequate sunlight.
-
Neglecting Insulation: For harsher climates, neglecting to insulate your cold frame can lead to plant damage.
Conclusion: Embrace Winter Gardening with a Cold Frame
Now that you know how to build a cold frame, you’re well on your way to enjoying winter gardening like never before.
Remember to use the right materials, follow the construction steps carefully, and position your cold frame wisely.
By conditioning your plants to withstand the colder months, you can reap the benefits of a home garden year-round.
Happy gardening, and may your cold frame flourish with vibrant winter harvests!