Are you curious about how to grow celery from scraps?
This sustainable method not only saves money but also minimizes kitchen waste.
In this article, we’ll explore the step-by-step process of growing celery from what you might typically throw away.
What Do You Need to Start Growing Celery?
Before diving into the practical steps, gather the following supplies to ensure success in your celery-growing journey:
- Celery bits: Use the base of the stalks, preferably organic.
- Water: Clean, preferably filtered.
- Container: Opt for a shallow bowl or dish that can hold water.
- Light: A sunny windowsill or grow lights for optimal growth.
Understanding these essentials will help you as you learn how to grow celery effectively.
How Do You Prepare Celery Scraps?
Preparation is key to successful regrowth. Follow these steps:
- Choose Fresh Celery: Select a firm, healthy stalk of celery. Freshness enhances the chance of successful regrowth.
- Cut the Base: Trim about 2-3 inches from the bottom part of the celery stalk.
- Rinse: Gently rinse the cut part under water to remove dirt and impurities.
By preparing the celery scraps correctly, you’re setting the foundation for healthy growth.
Where Should You Place the Celery Scraps?
Finding the right location for your celery scraps is crucial. Here’s what you need to consider:
- Light: Celery requires bright, indirect sunlight. This helps in photosynthesis, promoting growth.
- Temperature: Aim for a consistent temperature between 60°F – 70°F (15°C – 21°C).
- Water: The celery base should always have enough water to submerge the root ends. This prevents drying out.
In selecting the right spot, you’re maximizing your chances of successful regrowth and understanding how to grow celery efficiently.
How Long Does It Take for Celery to Regrow?
The regrowth timeline can vary, but generally, you can expect the following:
- Initial Growth: Within a few days, tiny roots will begin to sprout from the base of the celery stalk.
- Visible Leaves: After about two weeks, you should see new leaves emerging.
- Ready for Transplanting: In around 4-6 weeks, the celery will be mature enough to move to the soil if desired.
Patience and proper care are essential during this period.
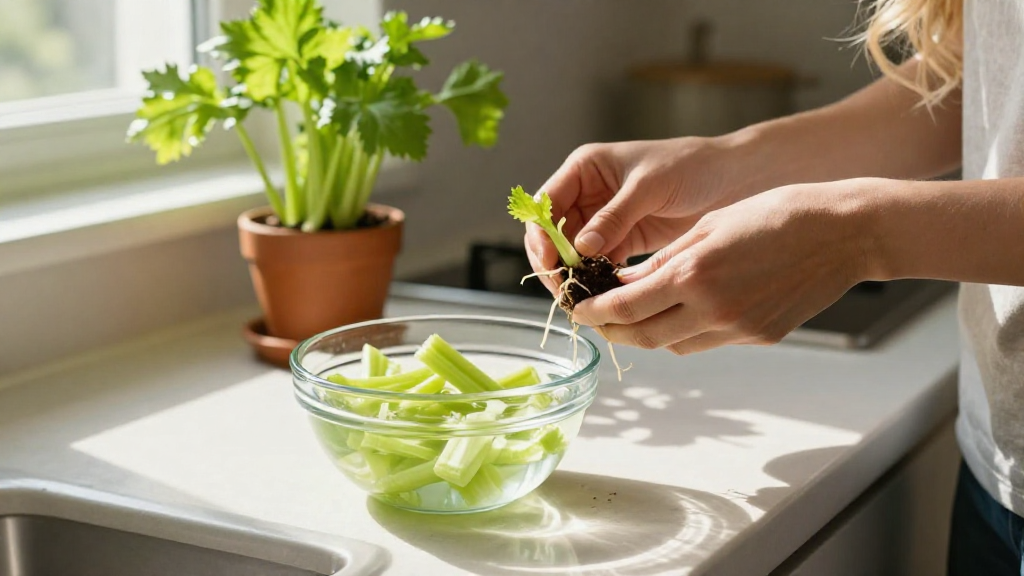
How to Transplant Grown Celery Scraps?
If you choose to transplant your celery scraps into soil, follow these detailed steps:
- Select a Pot: Choose a pot that’s at least 6-8 inches deep and has drainage holes.
- Prepare the Soil: Use nutrient-rich potting soil. This is critical for providing essential nutrients as your celery grows.
- Transplanting:
– Make a small hole in the center of the soil.
– Place the celery base in the hole and cover it lightly with soil, leaving the top exposed. - Water: Lightly water the soil until it’s moist but not soggy.
Transplanting provides the celery with more room to grow and allows you to enjoy fresh stalks right from your home.
What Care Does Celery Need After Transplanting?
After you’ve transplanted your celery, consistent care is crucial. Here are some care tips:
- Watering: Keep the soil consistently moist but not waterlogged. Aim for about 1-2 inches of water weekly.
- Sunlight: Ensure the celery is in a spot that allows for at least 6 hours of sunlight daily.
- Fertilization: Use a diluted all-purpose fertilizer every 4-6 weeks to boost growth.
By providing the right conditions, you’ll be well on your way to mastering how to grow celery.
Can You Grow Celery Indoors?
Yes, celery can thrive indoors, given the right conditions. Here’s how:
- Lighting: If natural sunlight is insufficient, consider using grow lights. Position them about 2-4 inches above the plants.
- Humidity: Celery prefers a slightly humid environment. Use a humidity tray or mist the leaves occasionally.
- Temperature: Make sure the indoor temperature is consistent, avoiding drafts or sudden temperature changes.
Growing celery indoors allows for year-round cultivation, right in your kitchen!
How Can You Troubleshoot Growing Celery?
Even the best gardeners can face challenges. Here are common issues and solutions:
- Wilting Leaves:
- Problem: This may indicate underwatering or too much sunlight.
-
Solution: Check the soil moisture and adjust the lighting.
-
Yellowing Leaves:
- Problem: Could suggest overwatering or nutrient deficiencies.
-
Solution: Assess watering schedules and consider fertilizing.
-
Slow Growth:
- Problem: Insufficient light or poor-quality soil.
- Solution: Move to a brighter location or replace the soil with a nutrient-rich blend.
Learning how to troubleshoot issues will enhance your success in how to grow celery.
When is the Best Time to Harvest Celery?
The timing for harvesting celery is crucial for the best flavor. Here’s when to do it:
- Maturity: Celery is typically ready for harvest about become 80-90 days after sowing.
- Size: Look for stalks that are about 6-8 inches tall and have a crisp texture.
- Method: Use a sharp knife to cut the stalks at the base, leaving the root in the ground for more regrowth.
Proper harvesting techniques contribute to enjoying fresh celery regularly.
Conclusion: Enjoying the Fruits of Your Labor
Learning how to grow celery from scraps is a fulfilling and eco-friendly way to enhance your garden.
With just a few basic steps, some patience, and a bit of care, you can enjoy fresh, homegrown celery throughout the year.
So next time you prepare a meal, think twice before discarding your celery scraps.
Instead, follow these expert tips and watch your kitchen waste transform into a thriving garden delight!